Ways to lessen the impact of prolonged hatching egg storage due to Covid-19
Tags: Egg handling | Whitepaper
, April 21 2020
The current Covid-19 pandemic is causing widespread market disruptions. While some countries are much worse affected than others, global demand for poultry meat has dropped as restaurants and fast-food chains have been closed. Some governments have banned imports of poultry meat to protect their country's internal market and processing plants are calling for a reduction in chick placements of 15–25 % in an attempt to stabilise the market. In addition, the closure of many traditional wet markets is having a dramatic effect on the poultry sector in less developed countries.
Although it is hard to predict the situation ten weeks from now (the time it takes between a hatching egg being laid and broiler meat reaching the market), in anticipation of the situation continuing, several hatcheries have reduced the number of eggs set. To reduce the supply of hatching eggs to the hatchery, older flocks can be culled earlier and, for younger flocks, forced moulting might be an option. Needless to say, this is not the time to send floor eggs to the hatchery or to be sloppy with egg grading.
When hatching eggs are supplied continuously, each day that they are kept in the storage room adds to the eggs' age. This has a negative impact on hatchability and chick quality once the eggs are set. This article offers hatchery managers some practical measures for reducing the negative effects of prolonged egg storage.
The consequences of prolonged egg storage
- Reduced internal egg quality : watery albumen and weaker yolk vitelline membrane
- Egg weight loss due to evaporation of water
- Reduced viability of embryo and thus lower hatchability
- Reduced chick quality (especially navel) and strong indications of reduced farm performance
- Longer incubation time
Storage reduces the quality of hatching eggs. As the ratio between thick albumen and thin albumen decreases, ultimately the albumen will become very watery. Water will diffuse from the albumen to the yolk, which can lead to yolk mottling, and the yolk vitelline membrane becomes weaker.
Water evaporates out of the eggs, resulting in egg weight loss which can be visualised with the aid of a candling lamp in a darkened room. The air cell will gradually increase in size.
Storage also has a negative impact on the embryo itself. As storage progresses, blastoderm cells will degenerate and die, reducing embryo viability. The direct effect of this will become evident when the eggs are incubated; both early and late embryo mortality will be higher and hatchability lower. Moreover, the longer the eggs are stored the faster hatchability declines. The data displayed in Figure 1 were collected over a 3-year period from 3 different hatcheries in the Netherlands and represent a total of 511 breeder cycles (or 24,234 batches). Contrary to what is commonly believed, the graph shows that hatchability of young breeders is affected more by prolonged egg storage (8–14 days) than that of old breeders (0.8 vs 0.4 % per day of storage for age groups 25–30 and 51–60 weeks, respectively). Nevertheless, the daily loss of hatchability increases for all flock ages with storage duration. Note that losses of 1–1.5% hatchability per day after 7 days of storage are not uncommon in practice. Looked at from this perspective, Figure 1 is on the optimistic side.
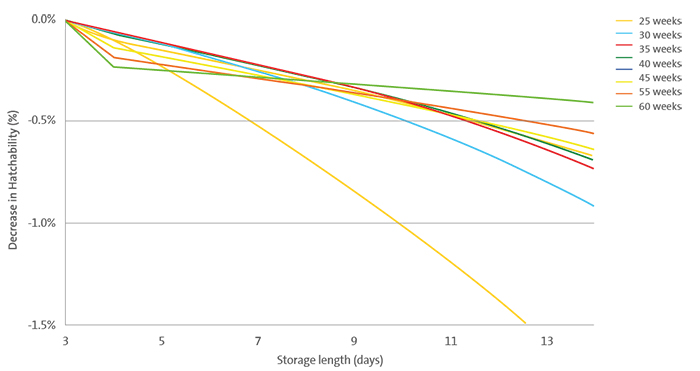
Figure 1: Daily decrease in hatchability in relation to duration of egg storage at the hatchery, excluding 1 to 4 days storage at breeder farm (Yassin et al., 2008)
Storage also has an impact on chick quality. Typically, more black navels are seen in chicks hatched from stored eggs. There are also strong indications that broilers' 7-day body weight is reduced, which could be a predictor of reduced slaughter weight.
Finally, storage slows down embryonic development during incubation resulting in a longer incubation time. In practice, the rule of thumb '1 hour extra incubation time for each day of storage beyond 4 days' works well. When eggs that have been stored for a long time are set together, the setter should be started earlier. But if eggs that have been stored for different lengths of time (e.g. 4–14 days) are set together, this will definitely result in a wider hatch window.
To summarise, best practice is to set hatching eggs 2–3 days after laying. Avoid storing eggs for longer than 7 days. If they need to be stored for longer than 10 days, there are some practical measures available for reducing the negative effects of prolonged egg storage.
Practical measures to minimise the impact of prolonged hatching egg storage
Where prolonged egg storage (beyond 10 days) is the only option, the main aim is to maintain the highest hatch potential. To do this you need to preserve the quality of the albumen and the yolk and most importantly the quality and vitality of the embryo, as far as is possible.
- Create optimal storage conditions:
- 12–14 °C/ 53.6–57.2 °F
- 80–85 %RH
- Aim for uniformity by allowing some circulation of air and keeping trolleys 10 cm from wall
- Avoid direct air flow from cooler or humidifier over eggs
- Be aware of ‘sweating’ when eggs are moved to setter room for incubation or for heat treatment
- Bear in mind that reducing the temperature of an egg storage room on a breeder farm might not be a good idea!
- Store eggs sharp-end-up if possible; alternatively turn them 2 – 4x/day as is done during incubation
- Apply 1 or more heat treatments during storage; that means heating up the eggs uniformly to at least 32 °C/90 °F for some hours
Optimal climate conditions in egg storage room
Temperature
If longer storage than normal is foreseen, it is essential to reduce the temperature in the egg storage room (see Table 1 for recommendations) at the hatchery to a lower level than would be needed to simply arrest further development of the embryo. (See also here). A lower temperature not only reduces the rate of thinning of the albumen, thus preserving its internal quality; it also slows down other cellular metabolic processes within the embryo, which is crucial for preserving the vitality of the embryo during diapause. Make sure that the sensors used to control egg storage-room temperature and the thermometers used to check the climate are reliable and recently calibrated.
Ensure that the temperature in the egg storage room is kept uniform by allowing minimal recirculation and not placing trolleys directly against the wall; keep a gap of approximately 10 cm. Also avoid placing eggs directly in the flow of air from the cooler or humidifier. Of course, this may be difficult to do in an egg storage room that is overloaded beyond its normal capacity. An option could be to utilise ‘free rooms’ as makeshift egg storage rooms by placing mobile coolers in them, or consider renting a refrigerated trailer.
A potential risk of lower storage temperatures is ‘sweating’ (condensation of water on the egg shell surface) if cold eggs are moved to the much warmer setter room, where the temperature is about 25 °C/77 °F. Water can act as a transport medium via which bacteria on the shell can enter the egg through the pores, and this may result in exploders later on during incubation. You can help to prevent this by warming up the eggs gradually before putting them in the setter room (if you have a room available at an intermediate temperature) and by keeping relative humidity low in the setter room. For more information see here. If this is impossible under the current circumstances, consider spraying the eggs with a liquid disinfectant – better wet with disinfectant than condensation water!
The above does not automatically mean that the temperature of the egg storage room at the breeder farm should be lowered as well. It is necessary to prevent hatching eggs from cooling down too fast after oviposition, as this can cause embryonic development to be arrested before the storage-resistant stage is reached. Moreover, during truck loading there will be an increased risk of sweating if the breeder farm egg store is too cold. When eggs are not stored at the breeder farm for longer than 3–4 days, a temperature of 18–21 °C/64.4–69.8 °F is fine. When prolonged egg storage at the hatchery is foreseen, 18 °C/64.4 °F is likely to be a better storage temperature. If that is not possible, consider increasing the frequency of transporting hatchings eggs from the breeder farm to the hatchery. More information here .
Relative Humidity
To prevent the eggs from dehydrating, it is advisable to keep relative humidity in the egg storage room above 75 %. To prevent the growth of moulds, however, relative humidity should not exceed 85 %. Take care that the eggs placed close to the humidifiers do not become wet! While the use of buggy bags to trap humidity and CO2 has been promoted in the past to minimise dehydration and maintain internal egg quality, this is no longer advised, as the risk of condensation and the growth of moulds is too high.
| Storage duration (days) |
Temperature (°C/°F) |
Humidity (%) |
Egg orientation |
| 0 – 3 | 18 – 21 / 64.4 – 69.8 | 75 – 85 | Blunt-end-up |
| 4 – 7 | 15 – 17 / 59.0 – 62.8 | 75 – 85 | Blunt-end-up |
| 8 – 10 | 12 – 14 / 53.6 – 57.2 | 80 – 85 | Blunt-end-up |
| > 10 | 12 – 14 / 53.6 – 57.2 | 80 – 85 | Sharp-end-up or turning 2 (4-6) x per day |
Table 1: Recommended climate conditions during egg storage
Egg position or egg turning
Unlike under normal circumstances, if storage beyond 10 days is foreseen, it is advisable to store eggs sharp-end-up (Elibol, 2008), starting on the first day of storage at the hatchery. Note that eggs should not be transported in this position as this leads to ‘loose’ air cells. This way of storage is only practical when eggs are placed on carton trays inside cardboard boxes. Once eggs have been placed on setter trays, turning them all manually sharp-end-up and then back to sharp-end-down again prior to incubation is far too laborious and also introduces the risk of creating hairline cracks. If eggs on setter trays are placed in setter trolleys, a very good alternative is to turn them 90°, twice or even better 4–6 times per day. Elibol (2002) reported that turning eggs 4 times per day during 14 days of storage was beneficial, especially for older flocks.
The most likely reason for the positive effect of either storing eggs sharp-end-up or turning them during storage is that these measures ensure that the embryo is always covered with a thin layer of albumen. This avoids the embryo coming into direct contact with the inner shell membrane at the location of the air cell; if this occurs, the embryo is likely to suffer from dehydration. If the egg is stored in the normal position, sharp-end-down, eventually the yolk will rise towards the air cell. The mechanism is as follows: the yolk is held in position in the middle of the egg by the two chalazae; these are connected to the yolk membrane at one end and to the thick albumen at the other end. As the thick albumen gradually gets thinner during storage, the chalazae are no longer able to keep the yolk in the centre of the egg. As the yolk has a lower specific gravity than the albumen, the yolk will rise and eventually come into contact with the air cell when eggs are stored sharp-end-down. In fact, due to differences in specific gravity, the embryo always lies on top of the yolk – no matter which way the egg is placed on the tray.
Heat treatment during egg storage
Subjecting eggs to heat treatment during extended storage can considerably reduce the negative impact of egg storage on hatchability (see Figure 2), although results will never be as good as those obtained from setting fresh eggs. Another advantage of heat treatment is that chick quality (especially navel quality) will generally be much better than if it is not done. The incubation time will also be much closer to that of fresh eggs. This form of heat treatment is also often called SPIDES, which stands for ‘Short Periods of Incubation During Egg Storage’ or ‘pre-storage incubation’. Heat treatment of hatching eggs during storage is common practice in GPS-hatcheries, where longer storage of eggs is often unavoidable, and also in some layer hatcheries.
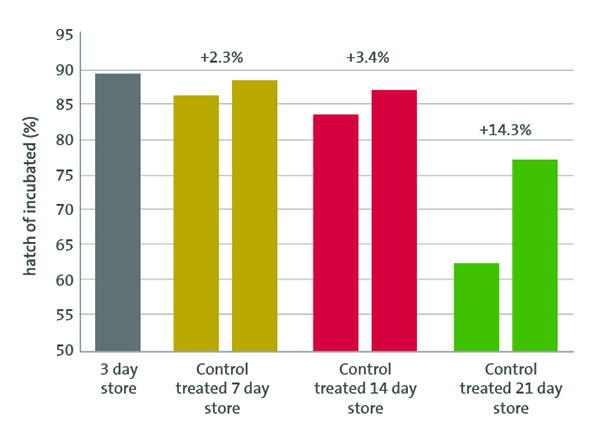
Figure 2: The effect of SPIDES-treated eggs stored for either 7, 14 or 21 days compared to untreated controls (Nicholson, 2013)
Note that heat treatment is only possible when hatching eggs are placed on setter trays and preferably in setter trolleys rather than farm trolleys, as these allow enough space around the eggs to ensure fast and uniform warming-up and cooling-down. The procedure for heat treatment during egg storage involves 3 steps: pre-heating, heating and cooling.
Pre-heating: The aim is to bring all eggs up from storage-room temperature to a uniform internal temperature; 25 °C/77 °F is recommended. This will make the heat treatment itself, the next step, more uniform.
Heating: The aim is to reach an egg shell temperature of at least 32 °C/90 °F and a maximum of 37.8 °C/100 °F. The eggs should remain at this temperature for approx. 3.5–5 hours (some even suggest 6 hours); the exact length of time depends largely on the stage of embryonic development prior to heat treatment (see additional notes below). The time that egg shell temperature is above 32 °C/90 °F can be monitored using data-loggers like Tiny Tags, but it can also be estimated by the following rule of thumb: 'when air temperature has reached 35 °C/95 °F, egg shell temperature will be 32 °C/90 °F and egg shell temperature will remain over 32 °C/90 °F for 30–60 minutes after the onset of cooling period'.
Cooling: The aim is to then cool the eggs back down to as close as possible to egg storage-room temperature, and at least to below 25–27 °C/77–81 °F. This could also be done out of the machine, as long as there is sufficient air flow in the provisional cooling room to cool down all the eggs uniformly. It is very important to avoid returning a full load of warm eggs to a cool egg storage room as this raises the temperature there, and fluctuations in egg storage-room temperature will lead to poor hatch results. Moreover, if there is not a good air flow in the egg storage room, eggs in the centre of the trolleys will take far too long to cool back down.
Why it is sometimes better to cut your losses by selling hatching eggs to the egg industry
The above measures can definitely help to minimise the negative effects of prolonged egg storage, but best results will still be achieved by setting fresh eggs. If – when regular setting at normal capacity commences again – your egg store still contains large numbers of eggs, it is probably better to take the painful decision to get rid of your old stock by passing the eggs on to the egg industry, rather than resigning yourself to sub-optimal hatchability and chick quality.
Points of attention when eventually setting long stored eggs
It is worth trying to implement as many measures as you can to reduce the impact of prolonged egg storage because eventually the eggs you have stored will probably be needed for incubation. Key points to consider when it comes to setting these eggs:
• Prevent ‘sweating’ when moving eggs from cold storage room to warm setter room by gradually warming up the eggs first.
• Lower egg storage temperature requires longer preheating!
• Set earlier to compensate for longer incubation time (1 hour per day of storage), unless heat treatment was applied during egg storage.
• Consider increasing the turning frequency during incubation to 4 times per hour. Elibol (2008) showed that this had a beneficial effect on 14-day stored eggs of old breeders.
• Expect a lower hatchability compared to setting fresh eggs; more eggs need to be set to produce the required number of day-old-chicks.
References
- Elibol, O., S.D. Peak and J. Brake. 2002. Effect of flock age, length of egg storage and frequency of turning during egg storage on hatchability of broiler hatching eggs. Poultry Science 81:945-950
- Elibol, 0. And J. Brake. 2008. Effect of egg position during three and fourteen days of storage and turning frequency during subsequent Incubation on hatchability of broiler hatching eggs. Poultry Science 87:1237-1241
- Eyal-Giladi, H. and S. Kochav. 1976. From cleavage to primitive streak formation: A complementary normal table and a new look at first stage of the development of the chick. I. General morphology. Developmental Biology 49:321-337
- Fasenko, G.M. 2007. Egg storage and the embryo. Poultry Science 86:1020-1024
- Nicholson, D. 2013. New thoughts on egg storage to optimise hatchabilty. International Hatchery Practice Vol. 27 No. 6
- Yassin, H., A.G.J. Velthuis, M. Boerjan, J. van Riel and R.B.M. Huinre. 2008. Field study on broiler egg hatchability. Poultry Science 87:2408-2417